

Part 2 - Creation of Legal Entity
- Musab Ashraf
- Jun 30, 2023
- 3 min read

Updated: Jul 4, 2023
To start setting up Dynamics 365, you need to create a legal entity
A legal entity in Dynamics 365 is a business organization that is registered with a legal authority. This means that it has a legal name, a registered address, and a tax identification number. Legal entities can enter into contracts and are required to prepare financial statements.
Creating legal entities in Dynamics 365 is an important step in setting up your organization and ensuring that your data is accurate and compliant.
Legal entities can also be used to comply with other regulations. For example, if you have a legal entity in a different country, you can create separate policies and procedures for that legal entity to ensure that it is meeting the requirements of the local regulations.
Step 1: Create a legal entity
To create a legal entity go to the following path
Modules > Organization administration > Organisations > Legal entities
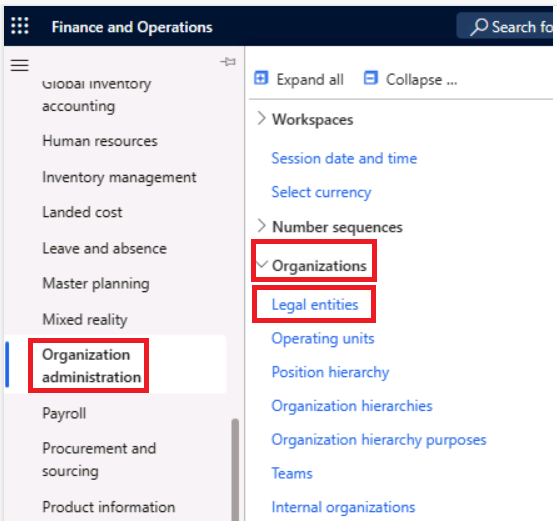
The legal entities form will open, click on New

New Legal entity creation form open.
Write the name of the Legal entity.
Write company id it can be of max 4 character
Choose the country/region of the company
Click Ok.

Now legal entity will be created

Step 2: Enter entity-specific information
Once a legal entity is created, there are multiple settings that you can perform on the legal entity
If we Expand the General tab here we can define
Search name, an alternative name to search legal entity
Whether this entity is for consolidation (to merge multiple subsidiaries) or elimination (to eliminate transactions between subsidiaries)
Set the localization of the entity on the basis of address or select another region from the drop-down. Localization is very important as dynamics will enable multiple features related to the region selected for example Tax 1099 is a US-based feature so if I select the US as my Localization, a Tax 1099 tab will be enabled in my vendor master. I'll talk about tax 1099 in detail in another blog
Select the language of the legal entity
Select the time zone in which the legal entity operates

In the address tab, we can enter multiple addresses of the business but, only one can be a primary address. To add a new address click on Add

Enter the required field and purpose of address if it is other than business, like for delivery or head office. and select the primary toggle button to yes if it is a primary address and click on ok. The system will re-classify the previous primary address as a secondary address and make this address the primary.

In the Contact Information Tab, we can enter various contact types for the legal entity.
this information can be called on various companies' reports and invoices

In Statutory reporting add DUNS ( Data universal numbering system), an IRS requirement

In the Registration number tab, mostly localized registration number fields are available, if your entity setup qualifies for one, enter those fields.
In the Bank account information tab, enter the bank routing number and purpose code. you can also enter a bank account but for that, you need to open a bank account first in the cash and bank management module

In the Number Sequence tab, you can view the number sequences that are associated with the legal entity. This will be empty to start with. Number sequences setup will be cover seprately.

In the Additional Registration tab, you can provide company insurance and pension fund details

In Dashboard Image, You can provide a company-specific dashboard image to comply with company branding needs. This image is shown on homepage whenever you log-in to system

In the Report company logo image tab, you can provide the company logo which can be called on the D365 reports header

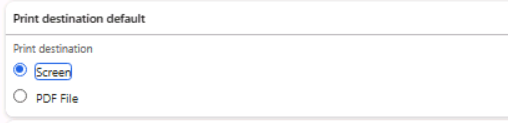
In the Print destination tab, you can dictate a system that whenever a report run in the system whether it by default open on screen or download as pdf
In the Tax Registration tab, you can provide tax registration number of the legal entity

In the Tax 1099 tab, you can provide 1099 information on legal entities like federal tax id, doing business as, and name control

In the Tax information tab, enter the tax-related info of legal entity
After all the detail has been entered, click save
Note, only information in the fields having a red asterisk is mandatory for legal entity creation, all other data that we enter is for keeping a record of the company and calling on various reports, and setting up various other parameters in the d365.


Comments