

"How to Integrate Dynamics 365 Data into Power BI for Enhanced Business Analytics"
- Musab Ashraf
- May 29, 2024
- 2 min read

In Microsoft Dynamics 365, we have multiple reporting options. It can either be Management Reporter, a solid GL-based financial reporting tool, or creating more complex, format-compliant reports using Electronic Reporting, which has all entities and data tables at your disposal. Both of these tools come in handy for functional consultants to meet clients' reporting needs.
Apart from MR and ER, we can also leverage Power BI to integrate data from Dynamics 365 and create immersive analytical reports with stunning visualizations
In this Blog, I'll try to explain steps to get data from Microsoft Dynamics 365 into Power BI
Lets create a very simple vendor balance report and by using same approach we can built more detailed and complex reporting.
Step 1: Connection Between D365 and Power BI
Power BI comes with built-in D365 connecter. For that first we will copy our Dynamics environment URL
We only need it till com/

Now open Power BI desktop app. Click on Get Data > More
Search Dynamics, select Dynamics 365 Online (legacy) then click connect

in Web API URL, Paste the URL and add data at the end

In next screen, select organizational account, Sign in and click connect

Step 2: Select Data
Once connection is made, Navigator pane will open which not only have access of raw tables but also the entities within our D365 environment
Lets' Select
Vendors V3 Entity
Vendtrans Table
click on transform data

Step 3: Transform Data
Power BI contains a powerful transformation tool, Power query. We can use power query to clean and transform our raw data. Vendors V3 entity is basically a Master data entity having many columns which we many not require. I'm using choose column functionality to select only require columns and remove redundant data

Once data is transformed, as best practice, I'll rewrite the name of query as Vendors V3 = Dim_Vendors
VendTrans = Fact_VendTrans


In home tab, click on "Close and Apply"

Step 4: Create Relation Between Dimension and Fact Table
Once the data gets loaded in Power BI, now we need to create link between both of our tables. Dim_Vendors contain the information related to vendor and Fact_VendTrans contains information regarding every transaction related to the vendors Click on Model view then Manage Relationship

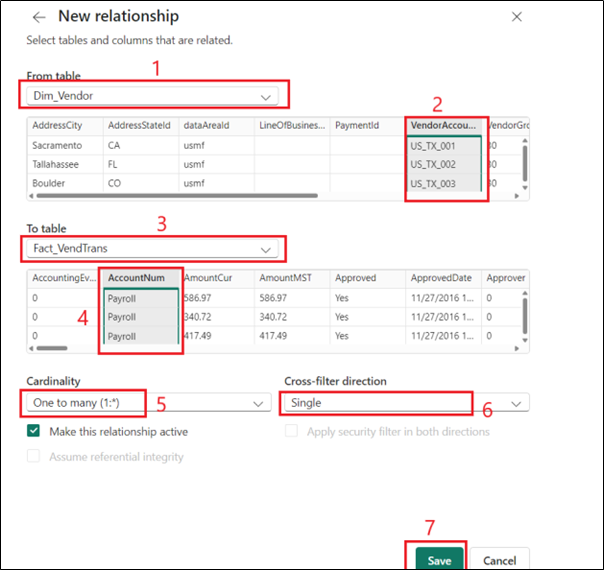
Click on New Relationship

Select Dim_Vendor in From Table and Select VendorAccount column
Select Fact_VendTrans in To Table and select AccountNum column (AccountNum is basically vendor ID)
Our cardinality will be One to many, as there should be a unique vendor record in Dim_Vendors table.
Cross-Filter direction will be single as Dim-Vendor table will be filtering Fact_VendTrans table
We will mark relationship as active and click save
Now, our two tables will be related

Step 5: Create Vendor Balance Report
Go to Report view and select Vendor Account Number and Vendor Organization name from Dim_Vendor Table

Select amount Reporting Currency amount from Fact_VendTrans

After some Formatting a presentable Vendor Balance report can be created like this


Comments